
Saturday, February 23, 2013
Pen stand into book holder
I made a book holder
 When I was visiting a friend, I saw a something on the table that I had not seen before. It was of steel. He showed me what it was when I asked. Immediately, I thought it was one project I could do. I thought I needed one for my use. So I borrowed it for making one like it, as a model. Then I went in search of the required materials at the marketplace. There are only two items in it. One is the stiff steel wire and the other was a flat sheet of metal.
 I found both items in one shop which sold that. For the flat sheet, I bought some copper. I was ready to do. Accurately bending the very stiff and tough steel wire was a real challenge, given my limited tools. I did not use the little vice I had. The wire was thin, but very stubborn. Finally I could do it reasonably well. I cut out the copper sheet for making the hinges. Luckily I had a cutter, which was actually a garden pruner my friend from Singapore had gifted me! I also embossed 'D' on the sheet after fixing it using a key-ring with the 'D'!
In the collage above, you can see the book holder in all its positions. I enjoyed doing this project and I used the holder on some occasions before the internet arrived!! I returned the borrowed steel holder to my friend and later showed my copy. It won his appreciation and I cherished that!
Friday, February 22, 2013
My stamp album
Once again, this is not exactly unjunking, but creating something out of cheap materials, yet serving the same purpose. But the one thing that was 'junk' in this project was the gift paper. Read on.

That is my entire stamp collection.

My 'Thematics' album.

My three main albums. The other two contains stamps of different countries, including old Indian stamps.

This is known as 'stock album', by philatelists. Album pages I made are of stiff card.

'Butter paper' - some call it as parchment paper - protects the stamps on both sides of the page.

Close view of the strips of butter paper I stuck to keep stamps. Note the thin line at the bottom where it sticks to the yellow sheet. I had flour paste as glue and I used to smear a broom stick with it and apply it on the card and then carefully stick butter paper strip to the card. It was a lot of work, also requiring a lot of patience. I also had time which was a bonus. You can see why I had time, in this connected blogpost.
First I had measured the card size and cut them out. Then I had made the butter paper strips, using a ruler and razor blade. In those days, we did not have pencil knives like we do now. It was really tough considering the tools I had then. The card was stuck with strips and folding in behind it the protruding ends of the strips. This is how the album pages looks from the side.

Then another card prepared similarly was stuck to it back to back. The colourful gift wrapper paper was stuck on the left side after sticking the butter paper sheet on both sides. This became one 'page'. All my sticking work was done with flour paste. After 30 years they stay good.
Similarly I prepared a lot of sheets, working over some weeks. I made these myself as I could not buy the costly ready-made stock books. It worked out cheap for me. My meagre pocket money sufficed. Moreover, I had a lot of pages that could be shuffled, because they were put together with a thread that ran through 'double punch' holes.


This was my first album gifted by a German lady, Hassenbach, who was a friend of Dr.Radha of our opposite house. The lady was visiting India and on knowing my interest in the hobby, gifted me with a little stock book and sent it through Dr.Radha after a few weeks! It was very motivational at that time. I think I was just 11 or 12 then. I tried to make my own album like this, but I could not and ended up doing what you saw above!
Potter Wasp Nest Vase!
 In an old shelf behind some bottles we had not used for sometime, I found this wasp nest with some ten holes. A potter wasp had found a nice place for nesting! When I found out, the nest had served its purpose and it was empty. So I carefully removed it for examining.
  The shelf was out of doors in a passage and insects like the wasp had access. I had kept the nest on my desk and at the same time, I had found 2 or 3 parrot feathers that had fallen below a tree at my workplace scooter shelters. I had brought the feathers home and found the holes of this 'work of clay' a nice place to keep them. When there was a light breeze the feathers would sway and it was an enjoyable sight. In about 15-18 months, I had found more feathers and you can see them all here, the holes filled up and made a nice vase!!
The nest was something like this. Pictured on the left is a different nest.
Thread spool toy
Some boys in my high school class had made a toy that would move upon winding. It was created out of stuff that were otherwise 'waste'. The toy had only four main components. A wooden thread spool, ball pen refill, rubber band and a piece of candle. A few rotations of the refill to wind the rubber were all that were needed to make the spool move. The candle piece would slowly release the rubber band tension as it unwound inside the hole. Simple mechanism!
Everyone was tempted to make one for himself. I did it too, but only after much trouble in procuring its main component, which was the wooden spool which I did not find at home. The sewing threads we had at home were on cardboard tubes. So I had to go to our tailor's shop was close by to ask for an empty spool. He would not part one saying "See, all of them have threads on them"! Since he was our tailor, I resorted to persistent pestering to which he finally gave in and handed me a spool to me. I was so happy.
The toy needed a thick slice of wax candle with a hole in the centre for creating that bit of friction needed for it to move slowly. I used a razor blade to cut the slice carefully out from the base of a candle. Once this was done, the toy was ready.
I had taken my toy to a relative's wedding. I would wind and leave it on the floor to see the fun when it touched people's feet under the chairs! In classrooms, racing competitions were held on desks during the short breaks. Pure fun!
I wonder how, where and by whom these little ideas originated! This was a classic!
~~~~~~~~
~~~~~~~~
For this post, I relived the old days in making one. I had a similar wooden spool but I had forgotten I had wound the soldering lead to it and kept in some box. When I found this yesterday, the joy I derived was similar when the tailor handed over to me!
It took me just 15 minutes to do. See how it works - *click*.
It took me just 15 minutes to do. See how it works - *click*.
Actually when the rubber band is a good one, the thing moves along steadily and more quickly than the one I got in the video. Here are some images:

The spool I found now.
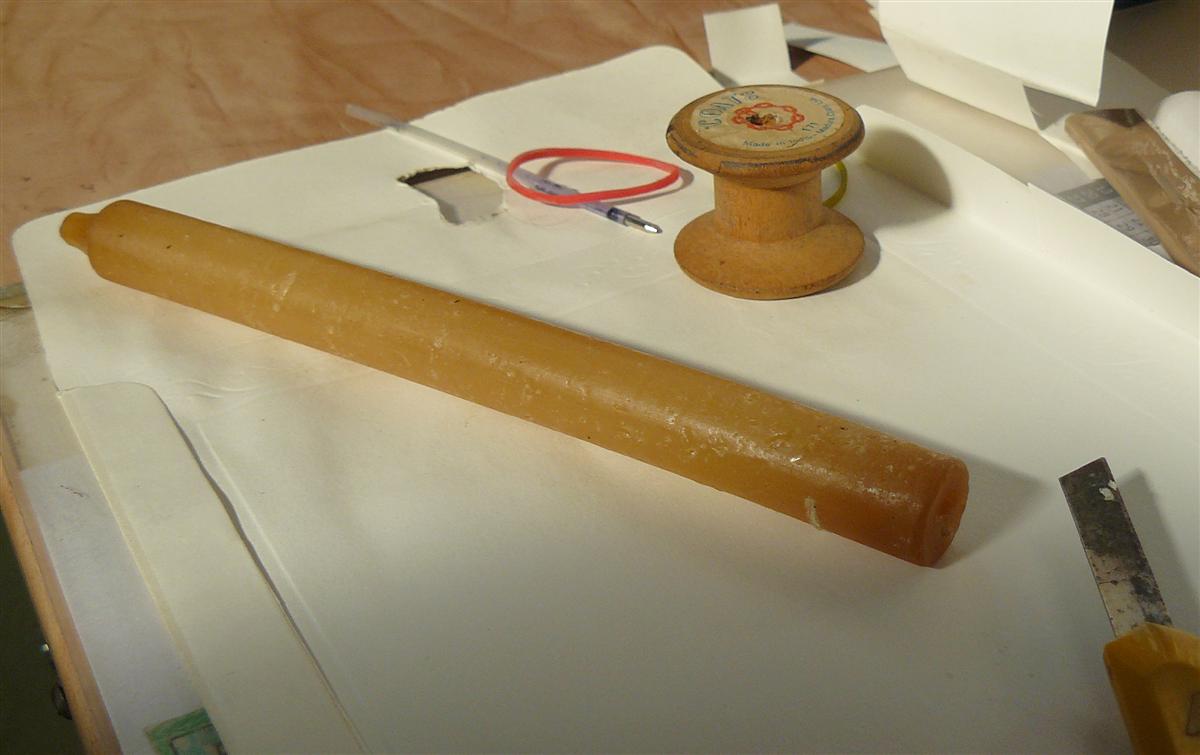
All materials ready. Paraffin candle, rubber band, empty refill and knife.

Candle piece cut out.

Ready! The rubber band goes through the hole and is held by another piece of stick - here I used a folded card. I also rubbed some candle for it to grip on the surface.

Comic strips into books
The 1970s saw the best period of my enjoying the comic strips that appeared in the magazines my father subscribed. Aside from those, I also used to borrow or buy comic books from libraries and friends. Each week, I used to look forward to the magazines being delivered because of my following the comic stories in them. A huge lot of them had got accumulated by mid 70s.
I had a lot of time, really a whole lot, at home when I was a student because I was achieving a rare feat! I must reveal that I took four years to complete the two-year pre-university after my 10th. Got the clue?
But I never wasted that time as I found plenty to do, besides playing street cricket and games. This post is about how I collected those comic strips from the old magazines and created comic books from a huge lot!
I arranged all the magazines date-wise, tore out the comic pages and kept in that order. There were two strips in one page and they had to be separated.
I had a long needle for stitching. Sewing thread was used after waxing it for added strength. I had seen this being done by the cobbler! I used 8 strands. It was tough piercing through the number of pages. So I used a huge sack-stitching needle to make a hole first, striking it with a hammer. Later I found out the book binders also did that!
It was a helluva lot of work, but I enjoyed doing it because there was no hurry and no academic pressures at all! I learnt the art of binding books on my own. The glue was created at home using flour! Some years later I entirely manufactured a photo album including the hard binding. But that is for another post.

Phantom strip was so thrilling. Illustrated weekly of India.

I used the notebook hard binding for this.

Dennis the Menace was my favourite humour strip.

This binding was got done by my grandfather's book binder who had done many law books for him.

I continued to do this for smaller strips from Deccan Herald, a daily newspaper, collecting esp. 'Blondie'.

Here lies my full collection of books I bound. The old magazines had to end up in a paper recycling unit. I'll make a separate post regarding the comics themselves. So watch out for that! It will be in "Mysorean Musings".
Thursday, February 21, 2013
Pencil extender

This is something like the cigarette holder. I discovered the need for using the shortened pencils further. All I did was put the two short pencils into a rubber/plastic tube. This I found in the form of a rubber sleeve provided for gripping the ballpoint pen. I removed it from an unwanted pen and lo, the longer pencil was ready. One pencil tip was fitted with a discarded pen cap that suited it perfectly.
I've used a similar pair of pencils and hung it from the 'sleeve'to a calendar for recording the daily milk supply quantity. Very handy.
Collage on the left is self explanatory.
Thursday, February 7, 2013
Utility Tools for One Rupee!

I did not make this, but decided to include in the blog because it is made of scrap metal converted to utility items. Some great mind has seen its further use and in the bargain, they are making a living, even if it was just hand to mouth.
I remember to have bought this in Bangalore more than 20 years ago when I was returning to the Bus Station with my elderly friend Srinivasa Rao after we had watched a Cricket Match at the Statium. We were to return to Mysore by bus and were on foot to reach the bus station. We were crossing a vast expanse of park where a nomad selling these came across our path and showed his ware. The little boy was having tens of these in a bunch, hung on his shoulder. His parents might have fabricated them and it seemed to be their living. Its price was One Rupee and made of brass! A mere one rupee, even in the mid eighties. Without thinking twice, I bought one. It had come to me on its own! And there was a need for such a tool.
The longest of this tool set measures 2 inches, which is meant for picking ear wax. The centre sharp one is useful to clean the nails and other things. The little tweezer is useful to remove any thorns or splinters that could embed in our skin. What handiness!
I have used all those tools countless number of times and I will be using it thousands of times, for what it is meant and its value is a thousand times more than a mere one rupee it had costed me! One of my favourite bunch of tools that has to be always found hanging near my desk! The best is of course the ear wax spoon! It's a wonderful feeling to lightly scrape the inside of the ear with it and with it finds the wax, it gives goose bumps! :) Better than 'ear buds'. But I can say the brass spoon is best suited for dry ear wax.
Sunday, February 3, 2013
Pocket Magnifying Lens
My fancy for lenses are age-old. Whenever I visited my grandfather's 'lawyer office', I would open the draw and pick up the big lens with a long handle and see through it. I enjoyed looking at the magnified images as I focused on the documents on his desk. He would say 'Careful, careful'. It was a very wide and beautiful glass, heavy for my little hand. When he died, we went to see his draw for taking back the things that belonged to him. But we were disappointed to see only papers. Someone in the office had taken away the pens, ruler, eraser and that lens I had dreamed of taking it home.
When I was about 12 or 13, I had pestered and bought a toy film projector for a huge sum of twenty five rupees. In this toy, there were three lenses - double convex. I resisted the temptation for a long time with great difficulty, of breaking it open to 'have them'! I'll write more about it in another post.
There were cheap quality low power lenses available for less than one rupee and came with a plastic handle that would soon break. They were of no real use but came in handy for making my telescope later, which I have already blo/bragged.
My neighbourhood friend Shankar had a beautiful vintage pocket magnifying lens,which was foldable, as the name suggests. It was very similar to this:

Shankar used to bring it in his pocket for playing with it mostly in the summer vacation. We would focus the sun on a dry leaf or a match stick head and even a piece of paper to watch it smoke and catch fire. This burning prank was played on a friend's skin and chose a time when he was engrossed in a chat. Boys used to do it unnoticed by the sufferer. It was great fun for the onlookers who would not alert the innocent victim who would wriggle the hand in a reflex action and rubbed that scorched part!
By the time I saw Shankar's lens, my projector was lying idle and I was no longer projecting movies [!!]. So it was time to fulfill the temptation of removing the lenses, because I wanted to make one such for myself. What beautiful lenses they are!
I knew all the materials required for this little project was with me. The most important part was the grooved rim to hold the lens. I found this from my father's magnifying glass having a plastic handle which was cracked. Its lens was loose and had come out. Now it had mixed up with the ones I removed from the projector. All were very identical in diameter and focal lengths! So in the end, I do not know which one I used.
My project required leather and I found my grandfather's 'used-less' card wallet which suited perfectly! The sewing machine is such a useful thing to have at home! The cover was ready now! To fit the lens, I had bent the rim around a little screw which was I think was an electrical part.

I still use this and keep it handy in the desk draw.
Toy Movie Film Projector
Information about a Toy Movie Film Projector was doing the rounds. It was around 1970. I cannot precisely remember how I came to know, but it could be from a demo cum sale at the Dasara Exhibition. Someone later had shown me the shop where it was sold too. This shop happens to be very close to where I now live and the small shed-like rooms of that portion is still existing.
Let me make it clear that this post is not about something I converted, but only bought. I am posting it here for a change, because some ingenious person ten thousand times better than me was selling his 'unbranded' machines fabricated from cheap and crude materials!
Cut pieces of 35 mm films were sold in little packets for 3 paise or so. I had a few such films and they were great fun. I was projecting them on the wall using a torch and a toy lens. It was a joy to see the magnified image! These film pieces were discarded portions of movie films from theatres. Films sometimes snapped during operation which necessitated a cutting off a certain length from the reel and rejoining, rendering the pieces waste. Some enterprising persons collected these portions and made a buck or two out of this waste film. We children fancied these tiny packets of film.
My father was a projection operator at his work. So I fancied doing the same at home when I came to know about toy projectors being sold. My pestering paid fruit. What a thrilling event it was to bring it home from that shop, fixing it on my bicycle carrier clip after paying twenty five rupees!! It was a sum equal to about four months of school fees.
I borrowed this image from the web to give an idea about how it was. Not exactly like it, but you can imagine a crude one made of unfinished wood, with a handle on the right and the light came in from the top of the box.

Since toy projectors were a fancy in those years, there was a demand for waste films and the longer strips used to be sold in small spools. I had procured some through my aunt who had gone to Bangalore where it was sold in great number. This is a reel, containing all the portions she had bought for me.


The projector's body was of scrap wood. All the parts were from scrap material. There was great ingenuity which had gone into it. The delivery spool and the focusable lens unit having 3 lenses were fabricated from zinc sheets, moving gears and the rotating handle were of iron, all custom made. A 60W bulb was fitted from the top which was removable. The entire unit was painted in silver colour.
There was only the delivery spool and no collection spool. After the show, we had lot of work rolling back by hand all the lengths of 'showed film' that would have snake up on the ground in a heap! This is what you get for twenty five rupees. The machine worked trouble-free, but broke, because I broke it for the lenses for my other projects! It became a victim of my curiosity and joined numerous items that met their end in this fashion.
The lenses did not fit my telescope project, but came in handy long later, that is just 4-5 years back when I used them to enhance power for my macro shots with my digital camera! I could use up to four lenses. At least two here are from that toy projector. The identical fourth one which became the pocket magnifying lens. [Click on it].

A paper-weight of wood and glass
 A perfume bottle stopper made of glass had been orphaned as its bottle had broken. It was in the vintage perfume box, kept aside. There was another loose wooden object, among the many items in the Dasara Dolls box that we used to remove from the attic for display annually for the festival and keep back after the ten-day event. This beautifully carved wooden object had a hole at the top and from that I could make out that it was the top portion of some 'mantap'. I thought I must make something out of this beautiful item.
 I had recorded 'Idea, June 1984' under it! Now that orphan stopper just fitted to the hole on this and it became a desktop paper-weight! And as I had guessed, it is of Sandalwood.
Subscribe to:
Posts (Atom)