Thursday, May 31, 2012

Lamp shade from a bowl

 I wrote about one Dr.Rama Shastry in my previous post about a Chess board.  Whenever I went to him to play Chess, my attention used to get attracted towards a lamp he had fixed at the edge of his vintage desk that had 1000 draws [exaggerating].  It was a simple lamp with a bulb holder, which was also the clip, something like what we see on writing clipboards.  The shade was adjustable to any angle and without the bulb it was a separate unit.  I found it very very interesting.  It used the curvature of the spherical bulb for tilting to any desired angle as work was done on a desk.  It was a fantastic little lamp that tickled my ingenuity!

I wanted to make one like it for my study table too!  There was a corner shelf fixed to the wall above my study desk and the location suited for using it. The advantage of this lamp was that it asked no space on the desk as table lamps do, but all it wants is something to cling on! 

Dr.Shastry's model was an old factory-manufactured unit and I needed something similar.  So I picked up a clip from a clipboard that was discarded.  Removed the two rivets from the old board, fixed the clip to another customized piece of hardboard.  Then, I fixed an old brass bulb holder to it with small nuts and bolts and a hole for the wire to pass through. 


This became my favourite lamp for many years until I found that it was no longer required for the desk.  I made a hole in the hardboard and hung it above the sewing machine for additional lighting.  It is still in use, 36 years on.  In the above picture, I have made a shade out of a discarded aluminum rectangular bowl. This was the second such shade.

Let me tell how I had made the first one.  There was an old ceramic coated bowl lying in the attic/store room along with other junk. I thought this was the most suitable one, even if I made a hole and damaged it. The spring-clip fixed to it will cling on the bulb and the round shape of the bulb will make it tilt to any direction and the spring tension will make it stay there.  That is the beauty of this design!  The shade must not be too heavy otherwise, it will tilt down by its weight.  That was the right weight too.  


I made the spring from a damaged bicycle wheel spoke I had in my tool section. I made an 'eye' to fix it with a nut to the bowl on the inside.  Ordinary metal wires will not suit for springs.  


This was one of my many enjoyable little projects that is serving me well even today.

Some more boards for games

I had written in an earlier post how I made my Scrabble Board and letters. This one is about a few other things.

A thought had zipped past like lightning many decades ago..... oooh, I'm that old to speak of  past decades, eh, eh??... about me making a carrom board!  It was a highly impossible project to even think of with no material, no tool and no resource.  Yet, I still wonder why that crossed my mind, despite we having a nice vintage carrom board with wide pockets.  Anyway... and for good, that thought never again returned!  May be, may be, the background for that was from the early 1960s when I had seen my senior friend opposite our house, Ganapathi having drawn carrom board lines on the floor with chalk, using seeds and some bottle caps as a striker!  They did not have a real board.  Yet, they still could play their own brand of carrom!  

Let me tell just a few words about this Ganapathi. He was a genius according to me. He used to make his own thread/rope to play the top - it was short and thick. The shortness of it used to win him games as quickness to play the top was a key factor to decide the winner!  He had 500 marbles that he had won from friends who played on the streets and footpaths. I used to envy his talent because I could never win against him, any game.  He was always the winner in street games.  In gulli-danda also he was an expert, not so much in street cricket. May be I will have a separate post on this fellow, later.

Let me share what I have made as I grew up to high school and during college days. Street children used to gather and play various games, both indoor and outdoor in those days. There were many games and many children too!  The street was abuzz with activity, unlike now. Come summer holidays, it was only play, play and play. I would like to emphasize that they were days when even the 'Calculator' had not been seen here!

My grandfather had bought me a 'Chinese Checkers'   It was a very interesting game. The 'original' board was torn out due to frequent use as it was made of cheap cardboard and fitted in a square box.  So I made one myself, taking a thick file of cardboard from my grandfather's office.  Drilling holes in it was very tricky.  I had by then, made my own hand drill, copying it from a carpenter who had made windows for a new room. The holes had to be smooth to insert and remove the coloured plastic pegs during the game. Finally, it came off nicely and we played many games thereafter also till the time we grew old for it.


I have been playing Chess since about 1970 or so.  Then towards 1977, I was playing a lot of Chess games with my classmates, street mates and particularly one old man by name Dr.Rama Shastry of the famous "Liver House" [our opposite house].  He was a brilliant player and I had the good fortune of defeating him only once. It still remains one of only two feathers in my chess cap. The other was defeating Masood Hussain [brother of old classmate Zakir - both sons of the famous historian Prof.B.Sheik Ali] once. Masood was also a fine player.  When I visited his house now and then, these opportunities for playing chess used to arise. It was a learning experience.  It was much before the TV a.k.a. Idiot Box era, so people had lots of nice things to do, really!

Dr.Rama Shastry had his chess board entirely lined with cloth to increase durability, while it made the black and white squares still visible.  He had drawn lines in pen to demarcate.  Paper boards used to wear off quickly.  What he had made was like the plastic lamination we use these days.  So I wanted to make one like his.  The cardboard chess board we had at home was smallish and it was cumbersome to arrange the wooden chessmen on the small squares.  It was from him that I learnt that the white square at the corner had to be to the players' right side.

There was a rattan stool that had a square top. I had a few pieces of hardboard left over from some of  my father's 'renovative' projects. Two of them suited the top, without too much cutting.  There was some black paint and some white paint and there was my will, time and material for a chessboard that would last long and take wear and tear also without losing its utility as a stool. Once painted, I fixed the two halves on the top and there it was!  The players could sit on opposite sides on smaller stools and play.  


When I see the date I've painted, I can't believe it was almost 35 years ago!

For other traditional games, the floor or even some paper or cardboard was needed to make a board.  Without a piece of chalk or something to write on the floor, we were lost when we wanted to play the game of 'Chowka Baara'. So I had made two boards - one having 5x5 squares and one with 7x7 squares.  The former was most popular. I had used a cardboard that came with the packing of one of my grandfather's new shirt!  It is still there I think.  But here is MS Paint drawing to show the 5x5.

[This is a web-grab image]

This is my 7x7 board.

The Cowrie Shells [brown ones] used as dice.  For the 5 square, we use 4 shells, for the 7 square game, we use 6 shells. Observe the wear and tear of the shells - they have been used for a number of years!


Saturday, May 26, 2012

PET bottles for rain water spout, etc.

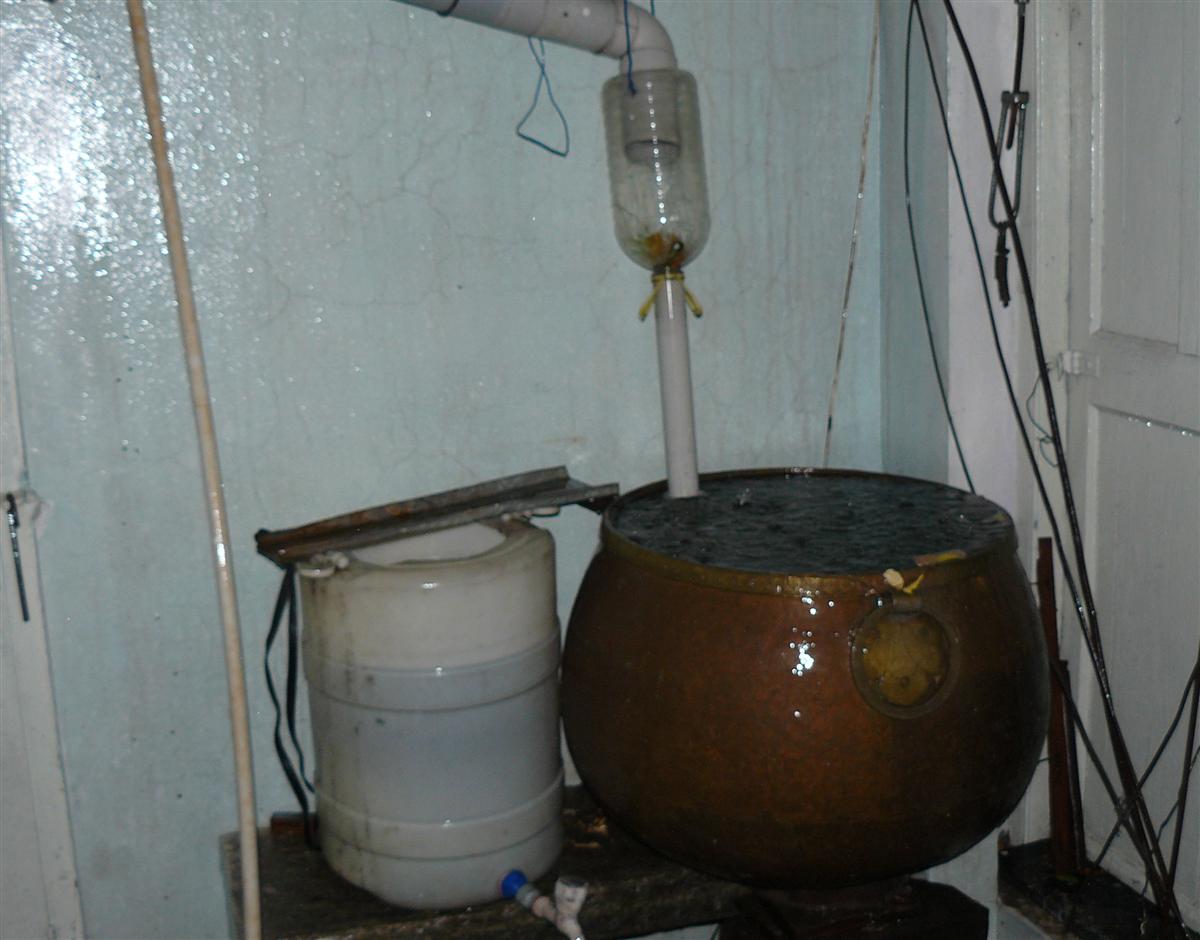
Recycling PET bottles can be fun, if only we have some plan for it. I had the need to turn the rainwater down spout to suitable angles which the ready 'L'bow, 'T' or '45 degree' units do not fit in.  So what I did?  I took my favourite 'black scissors' and cut the right size circular hole or openings at wanted places.  Of course, I had to mark the exact place and shape with the pen to cut.  I first cut well inside the line because the joint has to be 'unloose'!  The bottle must hold the pipe firmly.  Tight fitting, in simpler words. 

The greatest advantage with these bottles is that you can use it to the angle you desire.  I have used the bottle here because I did not want to cut the pipe length that was already there.  That way, even if it is removed, the pieces are not wasted.  If I had cut the pipe and took it to the edge, I could have used a ready L'bow but I did not want to buy a new one - I did not have it with me. The vertical pipe rests on a wooden piece on the balcony floor and so it is steady.  In addition I have also tied a piece of wire to the parapet to hold it firmly in place.


These bottles are very useful collection 'pots'.


I have used a bottle cut at both ends and a hole in the centre to fit the pipe to act as an L'bow.

Cutting the bottles is very easy, provided you are careful enough to make a neat and slightly 'inner measurement' cut so that a pipe can be properly inserted.

Here, the spout from the old balcony was of zinc and it had rusted away over nearly a century [that's how old the house is].  It was so brittle.  Connecting an 'L'bow or pipe to it was out of question.  So, I have placed a large bottle which was cut to custom requirement and placed there to collect and divert water through the pipe into the rain water filter. See picture below.


 Old asbestos pipe fitted to the balcony terrace, unusual size which is too large for the 75mm or too small for the 90mm 'L'bow. So, cut up a bottle.. 


 A large bottle to collect - like a funnel.  I had also put a piece of sponge into it, but it soon got clogged - too much dirt comes down from above our house which is on the main road which is busy with heavy traffic.  So, fugitive dust is too much load for the filters.  Removed the sponge as this rain waterwas collected only for flushing bathroom or toilet. 

Large bottle again, I used before. Crude methods, but it suited that place, which is now demolished and renovated.


~~~~~~~~~~~

I have used the bottle for other purposes also.  I had to find a way to clean the dirt without removing the water from the large barrel.  So, I chose a 500ml PET bottle [soft drink] that has a smooth surface without ridges and squeezable.  Some bottle designs wont suit this purpose.  Cut a hole in the cap to tightly pass a semi-stiff pipe into the bottom of the bottle.  I use this to suck up dirt from the bottom without emptying the barrel.  First squeeze out some air, hold it squeezed, insert the bottle into the water, suck up the dirt from the bottom slowly releasing the squeeze.  We can make designs in the dirt also there!   In fact, this is like a laboratory wash bottle.

This is an old picture.  When the bottle cracks from repeated squeezing, replace the bottle!  I have replaced 4-5 in as many years. Some are durable.


This is the latest one in use.  See how dirt sediments at the bottom and how it looks when disturbed and shaken.

The bottom half of a cut up bottle can be used for many many things. I've used one to fold and store digital camera cables.  We can also make rings to hold in folded cables.

One of the most interesting applications of the bottle I came across is this 'Water light bulb'! Watch the two and half minute video. Another person somewhere has 'repurposed' a bottle into a broom. [click on link on how to make it].  'Repurpose' is a new word that has started to get popular!

This image did the rounds on e-mail - bottle slippers used by African tribals.


Necessity is the Father of Creativity!


Monday, May 21, 2012

Vuvuzela

We had not heard about the Vuvuzela [click on the Wiki link] until the Football World Cup that was held in South Africa in 2010. In the link you can hear a short audio clip of how it sounds [scroll to the bottom of that page]. The link has some interesting information about the Vuvuzela, its use, its misuse, its controversy regarding use by spectators at stadia etc.  Let me not go into that much.

I had cut up a half litre PET bottle for something and the top half had to be thrown.  Thrown?  NO!  This was at the same time during the FIFA World Cup and I was reading about the Vuvuzelas in newspapers.  *Idea*! 

Without me doing anything more, this piece of the bottle now became the vuvuzela!  It was created unintentionally as a 'waste by product' and before throwing, I tried 'vuvulelaing'.  It worked - more like a megaphone than the vuvuzela.  It has no real use at home and at best I may later use it as a funnel to pour something into some container!  But to satisfy myself in the 'heat of the FIFA moment' and to participate [silently] in the vuvuzela movement, I wrote on it with a marker pen 'vuvuzela'.  That was it. 


It reminded me of blowing of the conch shell. 

Friday, May 18, 2012

Kitchen knife holder


Storing the kitchen knives in our kitchen was a requirement that was asking for long. Storing them in a tall vessel was cumbersome.  So I decided to make my own holder that would go on the wall beside the wash basin. All I required was some wood and nails.  Wood pieces were available in my wood-junk area.  Flat 'beading' left over piece was available, just the perfect dimension, except the length which I cut down. I required another fat piece to go at the back to have some gap between wall and knife handle to enable easy pick-up and keep-back. I need not tell that this is a vegetarian knife holder!  Bread knife, vegetable knife, butter knife!

I made 3 small pieces from the flat beading and kept them as 'spacers'. I placed two at both ends and one in the centre.  So I had enough gap to insert the blade and the handle rested above. Hanging it like this also enables water to drip down after washing. To add value to the project, I simply drove in a few thin nails on the outside and spaced them to hang small scissors that are very handy to open plastic-wrapped packets etc. 

Wednesday, May 16, 2012

Plate holder in the kitchen


There are plastic racks and holders with slits available.  They are designed to keep on the kitchen platform. To save space on the platform, I thought of something that could hold a lot of plates on the wall itself.  I had some good zinc wire that was pretty strong, removed from a clothesline that had snapped or replaced - I cannot remember exactly, but that does not matter.  I had suitable stuff on hand.  When that happens, half the project is over. Because we spend a lot of time searching for the right thing.

I bent the wire in the manner you can see in the picture, leaving it longer at the back where the two ends are intertwined. In that joining place, I have made provision for the nail/screw.  I have also joined another piece of wire across to prevent sideway expansion.  Since this is a tiled wall, I have used screw, just one.  See how it has taken the weight without sagging much. I was so delighted when it took that weight. Keeping the plates in the stand and removing them are both easy.  All other plates will stay in place.  The stiffness of the wire in the front and a slight bend in the curve will enable the plates to stay straight. This was another satisfying project that has proved to be very useful.

And I add that even if there are only a few plates, they stay in place.

Garden tray


Some years ago, I had cut the top portion of a 200 litre plastic barrel to have an open mouth for easy cleaning and access to water. This cut off portion was lying around as junk in the garden yard.  It had no other use other than as a crude lid for a smaller barrel.  It was too crude and crooked in flatness to use it happily.  So I did not prefer it. Once I was doing some digging the earth and had to shift some soil to another place and had nothing else in sight and was a bit lazy to go in and bring the circular tray from inside. So I took this and shifted the soil.  Holding it with the load in front of my stomach was irksome. The sharp edge seemed to hurt.

Necessity is the mother of invention.  Reminding it again!

What to do to stop it from hurting?  It was also too wide and too far from the stomach to hold comfortably.  *Brilliant idea* flashed. Bend the hurting part!

I took it into the kitchen, lit the gas stove and heated the portion where I wanted the bending.  I slowly kept folding it till it reached the desired angle and took it away from the flame.  I was also ensuring that the plastic was not heated in one spot lest it melted and caught fire.  Immediately, I  poured some cold water on it to cool and harden it back. 

After a few minutes I got back to garden work, using the newly shaped tray.  Yahoooo!   It felt really wonderful. As it turned out, the slight curve at the place I bent, fitted the curve of my stomach and I could now rest against it so that carrying the weight was easier and the load got distributed to the stomach.  I am happily using it in my garden ever since.